If you’re using Articulate Rise 360 to build e-learning, you already know how clean and responsive it is. But there’s one major challenge: unlike Storyline, Rise doesn’t natively support JavaScript triggers or built-in PDF certificate generation.
This makes it tricky to provide learners with a downloadable course completion certificate inside Rise 360.
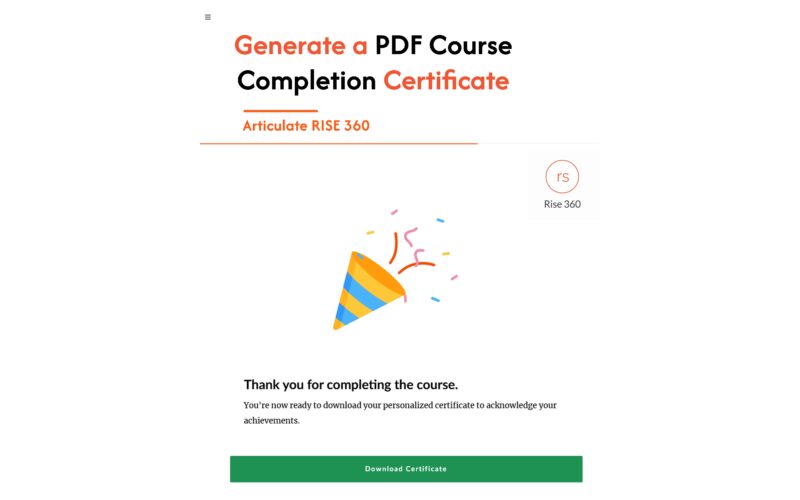
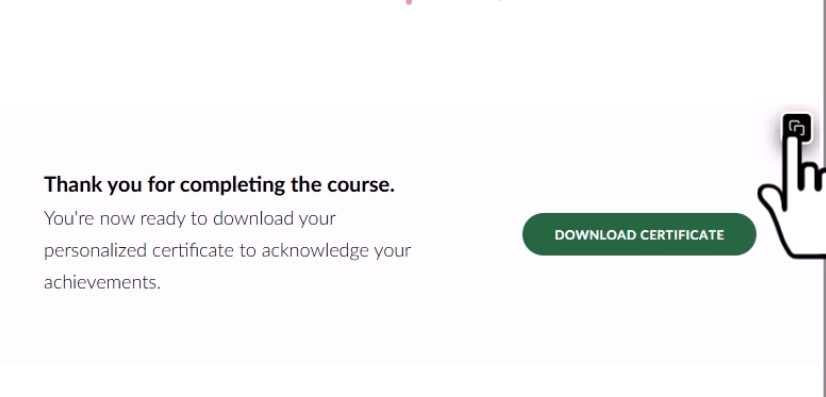
The good news? With my Articulate Rise Trigger Builder and a simple Chrome extension, you can now add this feature to any Rise course. In this guide, I’ll show you step-by-step how to generate and customize a professional PDF course completion certificate in Rise 360.
Preview
✅ Professional Design – clean, corporate layout with customizable colors
✅ Logo Integration – include your organization’s branding
✅ Storyline-like Triggers – powered by the custom Trigger Builder
✅ Responsive Layout – certificate adapts to different text lengths
✅ Instant PDF Download – one click and the learner gets their certificate
✅ Cross-Browser Compatible – works on all modern browsers
✅ Easy Customization – adjust colors, fonts, and text quickly
Prerequisites
Before you start, make sure you have:
- Block ID Chrome Extension
👉 Download here
This allows you to copy a Rise block ID for certificate placement. - Articulate Rise Trigger Builder
👉 Download here
This custom tool makes it possible to add triggers in Rise (similar to Storyline). - Your Rise Course ZIP Package
Export your Rise course as a ZIP file so you can attach and re-publish with your custom certificate.
Step-by-Step: How to Generate a PDF Certificate in Rise 360
Step 1 – Create a JavaScript Trigger
- Copy the Rise Block ID using the Chrome extension.
- Open the Trigger Builder.
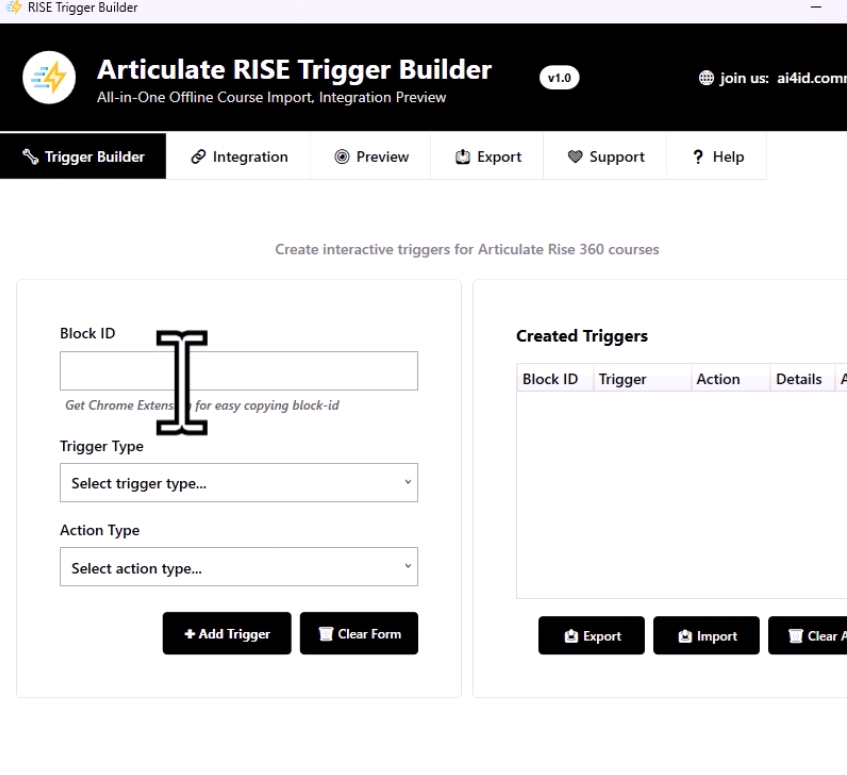
- Create a JavaScript trigger and attach it to your chosen block.
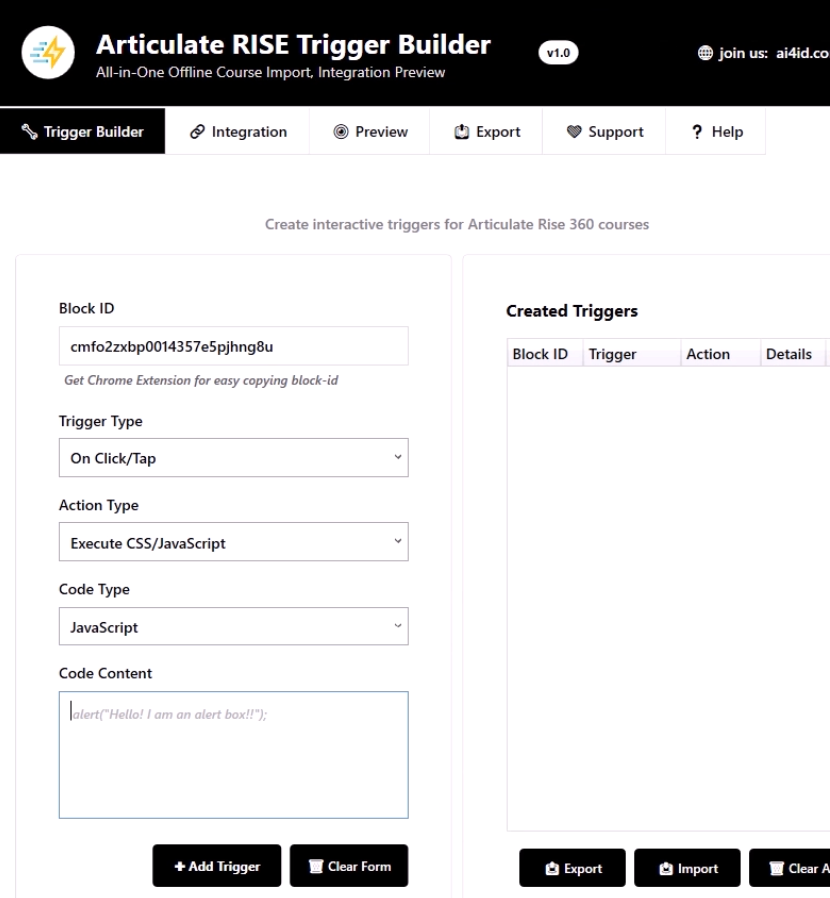
- Paste the certificate generation code into the JavaScript editor:
// Storylline Certificate Generator
//Author: N R Z Malik
//Website: https://eblog.nrzmalik.com
//Version: 1.2 - Fixed text overflow with configurable course title

// ========== CONFIGURATION VARIABLES ==========
// Colors - Change these values to customize the certificate appearance
var COLORS = {
    primary: [27, 20, 100],        // Main theme color (red)
    white: [255, 255, 255],      // White for text and lines
    black: [0, 0, 0],            // Black for text and lines
    border: [27, 20, 100]        // Border color (same as primary)
};

// Course Title - Set your custom course title here, leave empty to use page title
var CourseTitle = ""; // Example: "Advanced JavaScript Programming Course"

// Logo configuration (optional)
// Paste your base64 logo size (180*180). Generate it from https://www.base64-image.de/ code here, or leave empty string to disable logo
var LOGO_BASE64 = ""; // Example: "data:image/png;base64,iVBORw0KGgoAAAANSUhEU..."

// Logo settings
var LOGO_CONFIG = {
    width: 40,           // Reduced size to fit better
    height: 40,          // Reduced size to fit better
    rightMargin: 0,     // Distance from right edge
    bottomMargin: 0     // Distance from bottom (aligned with date area)
};

// ========== CERTIFICATE GENERATION ==========
var confettiScript = document.createElement('script');
confettiScript.src = 'https://cdnjs.cloudflare.com/ajax/libs/jspdf/1.5.3/jspdf.debug.js';
confettiScript.async = true;
confettiScript.onload = function() {
    generateCertificate();
};
document.head.appendChild(confettiScript);

function generateCertificate() {
    var date = new Date();
    var dd = String(date.getDate()).padStart(2, '0');
    var mm = String(date.getMonth() + 1).padStart(2, '0');
    var yyyy = date.getFullYear();
    date = mm + '/' + dd + '/' + yyyy;

    /*
    //For Storyline builtin variables, use the following code:

    var player=GetPlayer();
    var name=player.GetPlayer("Name");

    //And Remove or Comment the next following line:
    */

    var name = prompt("Please enter your name:", "");
    if (!name) {
         name = prompt("Please enter your name:", "");
    }

    var doc = new jsPDF({
        orientation: 'landscape'
    });

    var pageWidth = doc.internal.pageSize.getWidth();
    var pageHeight = doc.internal.pageSize.getHeight();

    // Main border
    doc.setLineWidth(2);
    doc.setDrawColor(...COLORS.border);
    doc.rect(10, 10, pageWidth - 20, pageHeight - 20);

    // Header background
    doc.setFillColor(...COLORS.primary);
    doc.rect(10, 10, pageWidth - 20, 40, 'F');

    // Header decorative lines
    doc.setDrawColor(...COLORS.white);
    doc.setLineWidth(1);
    doc.line(10, 40, pageWidth - 10, 40);
    doc.line(30, 10, 30, 40);
    doc.line(pageWidth - 30, 10, pageWidth - 30, 40);

    // Header title
    doc.setTextColor(...COLORS.white);
    doc.setFontSize(30);
    doc.setFont('Helvetica', 'bold');
    var title0 = "Certificate of Completion";

    var nameWidth = doc.getStringUnitWidth(title0) * doc.internal.getFontSize() / doc.internal.scaleFactor;
    var xPos = (pageWidth - nameWidth) / 2;
    doc.text(title0, xPos, 30, null, null, 'left');

    // Certificate content
    doc.setTextColor(...COLORS.black);

    doc.setFontSize(28);
    doc.setFont('Helvetica','normal');
    var title2 = "THIS IS TO CERTIFY THAT";
    var nameWidth = doc.getStringUnitWidth(title2) * doc.internal.getFontSize() / doc.internal.scaleFactor;
    var xPos = (pageWidth - nameWidth) / 2;
    doc.text(title2, xPos, 70, null, null, 'left');

    // Recipient name
    doc.setFontSize(50);
    doc.setFont('Helvetica','bold');
    var nameWidth = doc.getStringUnitWidth(name) * doc.internal.getFontSize() / doc.internal.scaleFactor;
    var xPos = (pageWidth - nameWidth) / 2;
    doc.text(name, xPos, 100, null, null, 'left');

    // Completion text - moved up to create more space
    doc.setFont('Helvetica','normal');
    doc.setFontSize(28);
    var title3 = "You have successfully completed:";
    var nameWidth = doc.getStringUnitWidth(title3) * doc.internal.getFontSize() / doc.internal.scaleFactor;
    var xPos = (pageWidth - nameWidth) / 2;
    doc.text(title3, xPos, 125, null, null, 'left'); // Changed from 140 to 125

    // Function to wrap text properly
    function wrapText(text, maxWidth) {
        var words = text.split(' ');
        var lines = [];
        var currentLine = '';

        for (var i = 0; i < words.length; i++) {
            var testLine = currentLine + words[i] + ' ';
            var testWidth = doc.getStringUnitWidth(testLine) * doc.internal.getFontSize() / doc.internal.scaleFactor;

            if (testWidth > maxWidth && currentLine !== '') {
                lines.push(currentLine.trim());
                currentLine = words[i] + ' ';
            } else {
                currentLine = testLine;
            }
        }
        lines.push(currentLine.trim());
        return lines;
    }

    // Determine course title - use CourseTitle variable if set, otherwise use page title
    var pageTitle = "";
    if (CourseTitle && CourseTitle.trim() !== "") {
        pageTitle = CourseTitle.trim();
    } else {
        pageTitle = document.title;
    }

    // Course title with proper text wrapping - moved up
    doc.setFontSize(24);
    doc.setFont('Helvetica','bold');

    // Wrap and display the course title
    var maxTitleWidth = pageWidth - 40; // Leave 20px margin on each side
    var titleLines = wrapText(pageTitle, maxTitleWidth);
    var startY = 145; // Moved up from 160 to 145
    var lineHeight = 10; // Proper line height for readability

    for (var i = 0; i < titleLines.length; i++) {
        var line = titleLines[i];
        var lineWidth = doc.getStringUnitWidth(line) * doc.internal.getFontSize() / doc.internal.scaleFactor;
        var xPos = (pageWidth - lineWidth) / 2;
        doc.text(line, xPos, startY + (i * lineHeight), null, null, 'left');
    }

    // Calculate dynamic positioning for date and logo, ensuring minimum distance from title
    var titleEndY = startY + ((titleLines.length - 1) * lineHeight);
    var dateY = Math.max(190, titleEndY + 25); // Minimum 25px gap from last title line

    // Date section
    doc.setDrawColor(...COLORS.black);
    doc.setLineWidth(0.5);
    doc.line(18, dateY, 43, dateY);

    doc.setFontSize(14);
    doc.setTextColor(...COLORS.black);
    doc.text(date, 18, dateY - 2, null, null, 'left');
    doc.text("Date", 25, dateY + 5, null, null, 'left');

    // Add logo if available (positioned relative to date)
    if (LOGO_BASE64 && LOGO_BASE64.trim() !== "") {
        try {
            var logoX = pageWidth - 18 - LOGO_CONFIG.width;
            var logoY = dateY - LOGO_CONFIG.height - 2;
            doc.addImage(LOGO_BASE64, 'PNG', logoX, logoY, LOGO_CONFIG.width, LOGO_CONFIG.height);
        } catch (error) {
            console.warn("Could not add logo to certificate:", error);
        }
    }

    // Save the certificate
    doc.save(name + " Certificate.pdf");
}
Step 2 – Attach Your ZIP Package
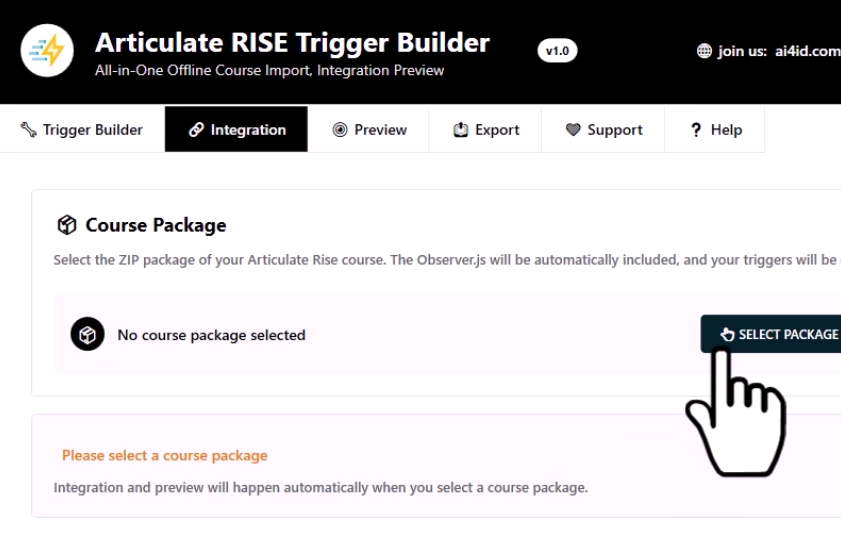
In the Integration tab of the Trigger Builder, attach your Rise 360 ZIP export. This will allow the custom certificate functionality to be embedded directly into your course.
Step 3 – Preview the Trigger
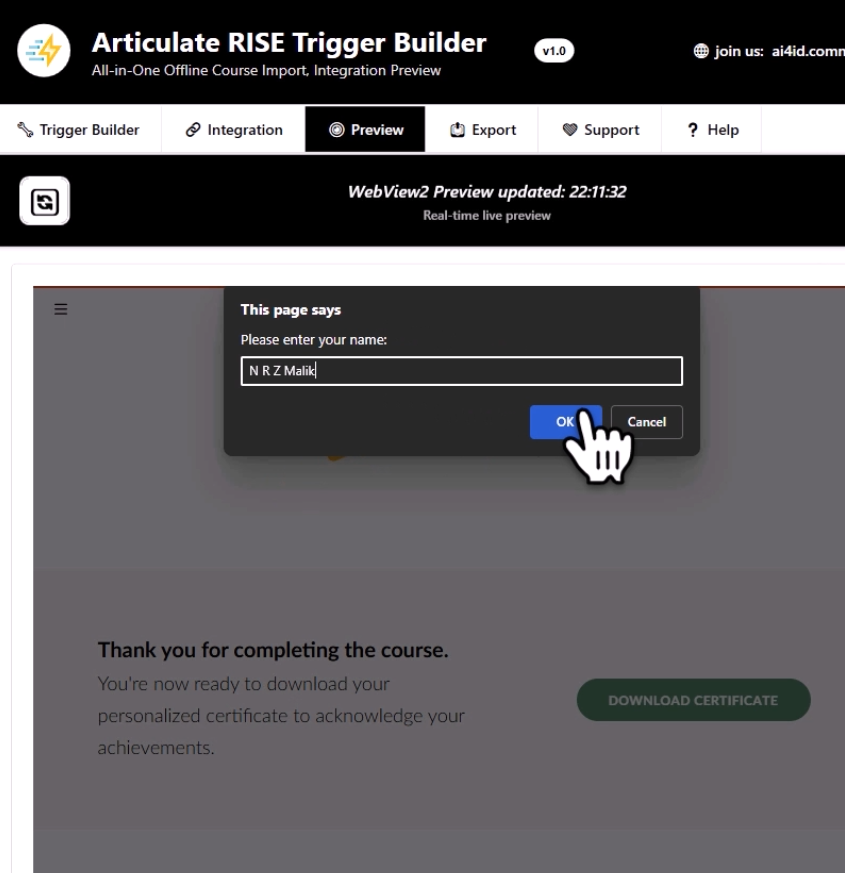
Switch to the Preview tab in the Trigger Builder. Test the certificate trigger to make sure the PDF generates correctly.
Step 4 – Export and Deploy
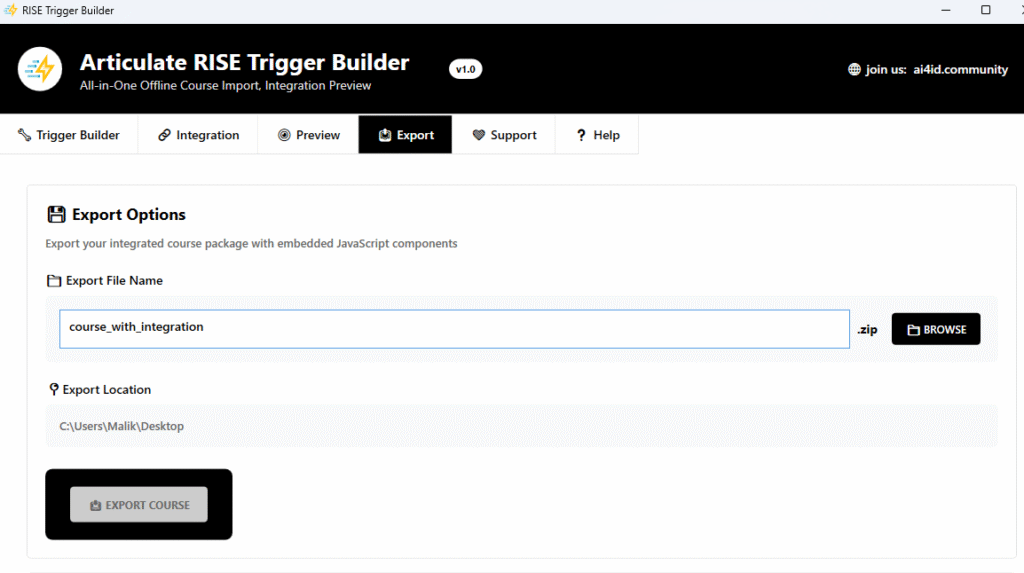
Once satisfied, export your customized ZIP package with the trigger included. It’s now ready to be uploaded to your LMS or deployed on the web.
Customization Guide
One of the biggest advantages of this solution is that you can fully customize the look and feel of your certificate.
1. Changing Colors
Update the COLORS object to match your brand:
var COLORS = {
  primary: [27, 20, 100],  // Header background (RGB values)
  white: [255, 255, 255],  // White elements
  black: [0, 0, 0],        // Text color
  border: [27, 20, 100]    // Border color
};
Popular Color Schemes
- Corporate Blue:
[0, 123, 191] - Success Green:
[40, 167, 69] - Classic Red:
[220, 53, 69]
2. Adding a Course Title
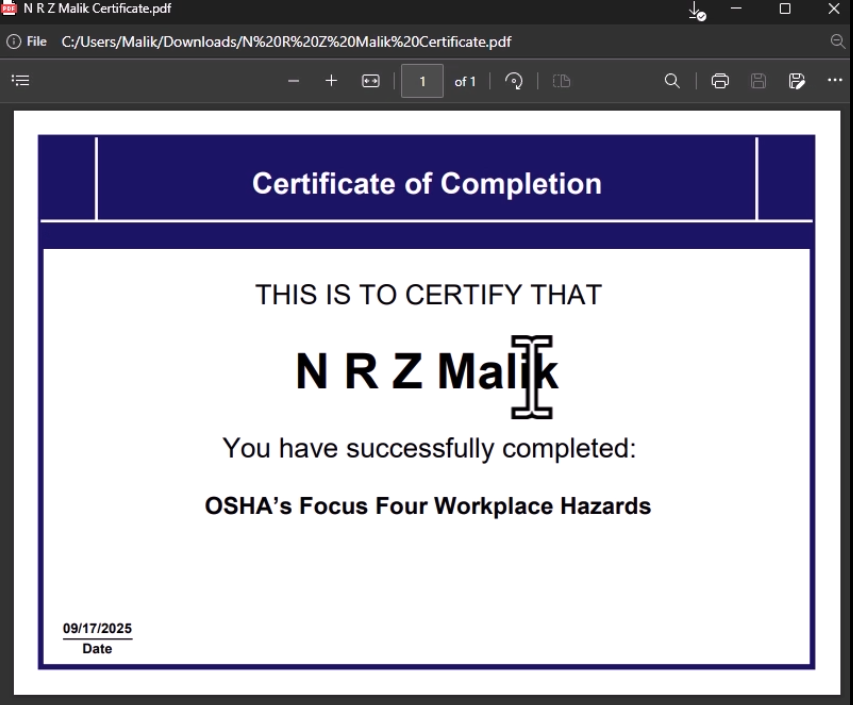
var CourseTitle = "OSHA’s Focus Four Workplace Hazards";
Example: "Advanced JavaScript Programming Course"
3. Adding Your Company Logo
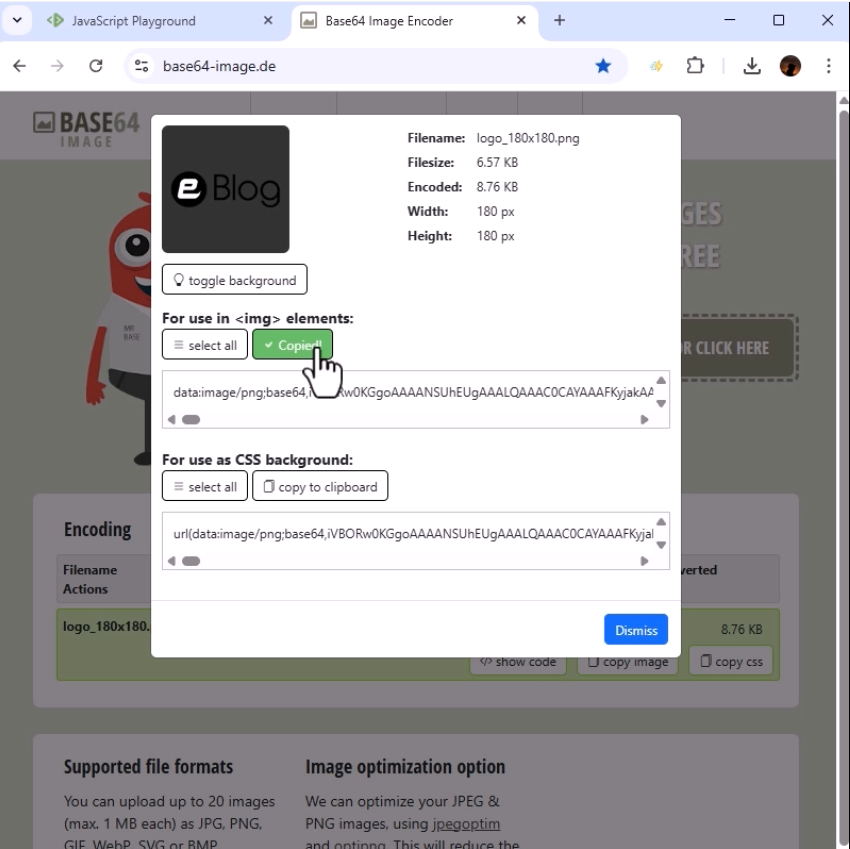
- Convert your logo to Base64 at base64-image.de.
- Replace the string in the code:
var LOGO_BASE64 = "data:image/png;base64,iVBORw0KGgoAAAANSUhEU...";
- Adjust the size and margins:
var LOGO_CONFIG = {
  width: 50,
  height: 50,
  rightMargin: 0,
  bottomMargin: 0
};
4. Customizing Certificate Text
var title0 = "Certificate of Completion"; // Header
var title2 = "THIS IS TO CERTIFY THAT";  // Statement
var title3 = "You have successfully completed:"; // Completion text
Examples:
- “Certificate of Achievement”
- “Training Completion Certificate”
- “Professional Development Certificate”
5. Advanced Customizations
- Custom Fonts
doc.setFont("Helvetica", "bold");
- Layout Adjustments
doc.text(title2, xPos, 70, null, null, "left");
Change the Y-axis value (70) to adjust positioning.
Final Thoughts
Adding a PDF course completion certificate in Rise 360 isn’t straightforward since Rise doesn’t support JavaScript natively. But with the Trigger Builder and Block ID extension, it becomes not only possible but also highly customizable.
This solution lets you:
- Deliver professional, branded certificates
- Give learners instant proof of completion
- Enhance the overall learner experience